You can take the Santa Fe Corn your kids just made (see post below) and turn it into a quick dinner!
Black Bean Quesadillas
Heat a nonstick skillet over medium heat. Place your favorite kind of tortilla in the skillet. top with a little cheese, a couple spoon fulls of Santa Fe Corn and a little more cheese. Add another tortilla on top. Heat until the cheese starts to melt and tortilla starts to toast. Flip carefully and heat to toast the other tortilla.
Serve whole or cut into pieces. You can dip them in sour cream, salsa or guacamole if you like.
Thursday, December 01, 2005
For the Little League...
I have three sons. We are a family of five. At the moment I am cooking for seven and I doubt it is going to get any better anytime soon. Everyone has always told me that boys EAT. I didn't believe them, notice the past tense here. I do now.
Luckily, the boys have noticed this little correlation between food and cooking. Specifically cooking seems to have to happen in order to have food. So, now they are getting interested in cooking. I think that is a good thing.
So, I keep my eyes out for kid friendly recipes. That is ones they will eat and ones they can help with and not wind up in the emergency room as a result. Here's one any kid that can work a can opener can do. And it actually tastes good too:
Santa Fe Corn
Mix: 2 cans drained corn, 1 can drained and rinsed black beans and 1 can diced tomatoes, also drained. Heat using your favorite methods.
If you like it with a little kick, use seasoned tomatoes.
This is good over yellow rice, topped with some cheese.
Friday, November 25, 2005
Turkey lurking?
I'm willing to bet there are a pile of turkey left overs hiding in your fridge. Here are a couple of different ways to use them up.
I got this idea from a sandwich I had in a Cuban resturant on our trip to Florida. The sandwich was called "Elena Ruz": On some good bread spread cream cheese, strawberry preserves (or cranberry sauce) and sliced turky. Toast lightly. Really good...
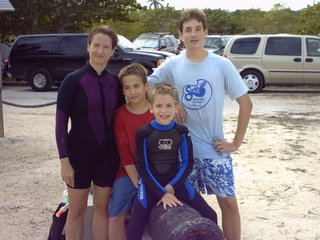
We went snorkling after we had our Cuban lunch.
Here's another turkey idea. My kids abolutely love this one. It works with chircken too, so sometimes I'll make up some chicken just for this recipe:
Turkey and Cranberry Couscous
Heat 2 C of chicken broth to boiling. As a 10 ounce package of couscous, 1/2 c dried cranberries, 1 T dried minced onions or 2 minced green onions, 2 finely chopped ribs of celery (optional). Remove from heat, cover and let stand 5 minutes. Then chop 1 cup of turkey meat, 1 large apple (Gala and Breburn are good choices) and 1/2 C pecans, almonds or cashews. (I like to toast th enuts, but you don't have to). Mix the dressing: 1/4 C olive oil, 3 T red wine vinegar, 2 t dijon mustard, 1 t sugar, 1/4 t thyme, 1/2 t salt, pepper to taste. Toss couscous with all of the above. Fluff with fork and serve.
Enjoy!
What's for dinner?!?!

No! I'm not going to post 'gator recipes!
We just got back from a trip to Florida and I couldn't resist posting a couple of pictures. My little guy wasn't too sure about who was holding whom!
Monday, November 14, 2005
Please Pass the Salad Dressing....
It's not just for salads anymore! Salad dressing is a great shortcut for adding flavor to meat. And since there are lots of varieties, you have tons of options. On top of this, the recipes are really kid friendly to boot. The salad dressing are flavorful without being overpowering and their flavors are familiar so kids have an easier time enjoying these recipes. Here are a few to get you started.
The nice thing about these recipes is that they work equally well for pork or chicken, so they are two for one special here. Start with either 5 lbs (or 5 meals worth) of chicken or pork chops. If you use more than a pound of meat per meal, increase the sauces accordingly.
Pre heat oven to 350F.
Catalina Chicken
Mix together: 1/2 C Catalina salad dressing, 2T dry minced onions and 2 tsp beef bouillon (I heat it a little in the micro to dissolve the bouillon). Spray an 8x8 baking pan with Pam and place 4-6 pieces of chicken in it. Pour sauce over top.
Italian Chicken
Mix together 1/2 C Italian Salad dressing and 3-4 T parmesan cheese. Spray an 8x8 baking pan with Pam and place 4-6 pieces of chicken in it. Pour sauce over top.
Raspberry Vinaigrette Chicken
Place 4-6 pieces of chicken in a sprayed 8x8 baking pan. Pour about 1 c of Raspberry vinaigrette salad dressing over top.
Parmesan Ranch Chicken
Mix: 1/2 C Ranch salad dressing, 2 T flour, 2 T parmesan cheese. Spray an 8x8 baking pan with Pam and place 4-6 pieces of chicken in it. Pour sauce over top.
Honey Dijon Chicken
Place 4-6 pieces of chicken in a sprayed 8x8 baking pan. Pour about 1 c of honey Dijon salad dressing over top.
Place all of this in the oven and bake 20-30 minutes, or until all the meat is just barely done. Times will vary according to the thickness of the meat and whether or not you have the bone in or not.
Dinner Salads
As an extra bonus, you can serve these as simple main dishes or you can add them to salad greens with croutons, your favorite cheese, tomatoes or other bright veggies and the dressing you cooked them in and you have a great dinner salad! So now we're up to 20 different meals for the price of 5 recipes! Not too bad, huh?
Sidelines: Parsleyed Pasta
What are main dishes without something on the side? The problem with side dishes is that they can get so complicated that they are more trouble than they are worth. Here's one that everyone loves and is too easy not to include for dinner!
Parsleyed Pasta
Cook up enough of your favorite pasta for your family. [Flat noodles like egg noodles or orzo are better for this than hollow ones like macaroni.] Drain it and put it back in the cooking pot. Add a generous gob of margarine or butter, a generous dose of salt and pepper and a handful of dried parsley that you have crushed in your hands first. Toss well, and let sit of a couple of minutes, lid on the pot, to let the flavors blend. This is mild tasting, but it really gussies up plain old noodles
Friday, November 11, 2005
Have friends...will cook!
 Cooking alone can be a little dull at times, so I invited a couple of friends over for a 'power cooking' session. The kitchen was wall to wall food that night! A month's worth of meals for 3 families--wow!
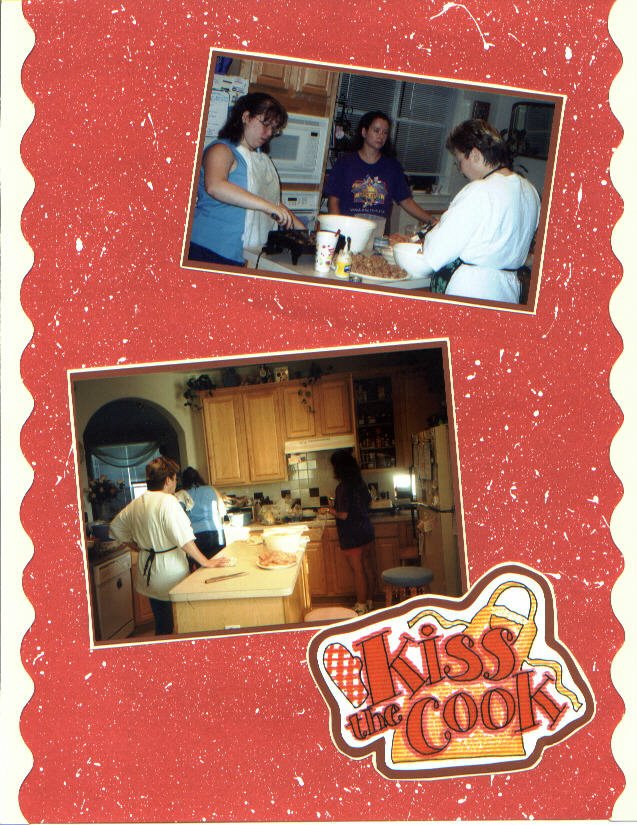
Gotta admit though, it was a blast!
Thursday, November 10, 2005
Dinner in 20: Fideo Soup
Sometimes you just need to put something on the table fast. Sometime you can pull from freeer stock, sometimes just from what is on hand in the pantry. Tonight was one of those nights. I taught a late class and had an appointment come in just after I got home. So I couldn't start dinner until 6:30! So fast was crucial! Since I'm not the only one in this boat, I'll try to post some super fast dinner ideas for those nights!
Tonight we're having:
Fideo Soup with Meatballs
Bring 2 quarts beef-tomato broth to a boil. (I use beef-tomato bouillion cubes, but 6 C of beef broth plus 2 C of tomato sauce is the same thing)
Add a can of diced tomatoes (14 ish ounces)
Once it is boiling, add frozen, precooked meatballs or a pound of cooked ground beef.
Return to a boil and add 6 or 7 ounces of fine egg noodles (fideos).
Simmer 7-9 minutes until pasta is done.
Serve with lots of cheese on top. My kiddos love this.
Wednesday, November 09, 2005
Principles of Freeze and Serve Cooking
Basic principles:
1. KISS-Keep it simple sweetie
2. Anything that makes it more difficult for you to do something, or more hassle makes it less likely that you will do it
3. Concentrate on simple, main dish recipes
4. Avoid those things which require special techniques or equipment
5. If you don’t like to eat it, don’t make it!
Get the most bang for the buck
1. Both time and money
2. Time; focus on quick easy dishes; by cooking them all together we save a lot of time
3. Same money by capitalizing on sales and buying much more than you would usually be able to use.
Store wisely so that you do not need a ‘big freezer’
1. Store food, not containers
2. Save space by using ziplocks, press and seal wrap and disposable trays
3. Do not try and put large dishes in the freezer
Thawing and Heating
A big issue when doing freezer cooking is always how do I thaw the meals and how reheat meals. So here are some ideas about how to manage those tasks.
The best way to thaw, is to take things out the night before and put them in the fridge. I always put the zip-lock bags from the freezer in a dish of some kind before I put them in the fridge, just in case the bags have a small tear in them. That way they do not leak as they thaw. Using your microwave's thaw setting (usually 30% power) is a good second. Open the bags and put them in a dish of some sort. You can thaw the food inside the bags. Start with 3 minutes at a time turning the food and/or stirring it every 3 minutes, until no longer frosty. Try not to thaw things on the counter, you risk food poisoning that way.
To reheat, the microwave is a good choice. I always use about 70% power and start at 2 minutes, adding time as needed. Every microwave is REALLY different, so you will have to find what works with yours, just start slow at first, you can always add more time if you need it. You can also reheat in the oven, 350F, start with 20 minutes, then check at 5 minutes intervals if you need more time. Things with sauce can be heated in a shallow pan on the stove top over medium heat until they reach serving temperatures (about 140 F for those who care about such things).
Here chickie, chickie, chickie
The Main Event!
Now for the recipes!
The key to these recipes is keeping them simple: simple to cook and simple to eat. Part of keeping them simple is having a great deal of flexibility in the recipes. The following set features chicken--you pick what pieces you like. I make them with boneless chicken breast--which I stock up on when there is a good sale! But you do not have to. You may choose to use dark meat, mixed white and dark meat or pieces with the bone. It is up to you. I do suggest you remove the skin, though, to cut down on the grease in the sauce when you are done.
Keep in mind though, the cooking time may have to change a bit, depending on the meat you use. Cook it 10-15 minutes longer if you use pieces with bones in them. Make sure you cook the meat through, but just barely, that way it will reheat well. The first time you do these, watch them closely then, write down the amount of time you cooked the meals. That way you do not have to reinvent the wheel next time you cook. The first time is always a little experimental, it gets easy after that.
O.K., enough talk already, how about some food! Start with 5 lbs of boneless chicken breast, or enough of your favorite chicken pieces for 5 meals. If you are cooking more than 1 lb. of mean per recipe, increase the sauces accordingly.
Preheat the oven to 350F, then:
1. Oven Fried Chicken
Brush chicken pieces lightly with mayonnaise. {Note here: Do not stick the brush in the jar or you will risk contaminating your mayo with chicken juice…bad idea! Put a spoonful in a dish and go from there. Throw out any that is left in the dish after you finish the next recipe, don’t put it back in the jar} Coat with seasoned bread crumbs. Spray an 8x8 baking pan with Pam and place 4-6 pieces of chicken in it.
2. Honey Crunch Chicken
Brush chicken pieces lightly with mayonnaise. {Note here: Do not stick the brush in the jar or you will risk contaminating your mayo with chicken juice…bad idea! Put a spoonful in a dish and go from there. Throw out any that is left in the dish, don’t put it back in the jar} Spray an 8x8 baking pan with Pam and place 4-6 pieces of chicken in it. Over top of the chicken, sprinkle about 1/2 c of Grapenuts cereal. Drizzle honey lightly over top of the cereal.
3. Lazy Day Chicken
Mix 8 oz tomato sauce (or puree) with 2 T dry minced onion, 1 tsp (or 1 cube) beef bouillon and 1/4 c water. (I heat it a little in the micro to dissolve the bouillon). Spray an 8x8 baking pan with Pam and place 4-6 pieces of chicken in it. Pour sauce over top.
4. Rotisserie-taste chicken
Place 4-6 pieces of chicken in a sprayed 8x8 baking pan. Lightly spray chicken with Pam. Sprinkle heavily with McCormick rotisserie chicken seasoning.
5. Lemon-garlic Chicken
Mix the juice of one lemon (2-3T juice), 1/2 tsp thyme and 1 clove crushed garlic (about 1 tsp) Spray an 8x8 baking pan with Pam and place 4-6 pieces of chicken in it. Pour sauce over top.
Now that you've finished all that. bake everything for 25-30 minutes, depending on the pieces of chicken you are using. If they are not cooked through after thirty minutes, check them at 5 minute intervals, and remove them when they are just barely cooked through. Depending on the size of your oven, you may need to do it in two batches.
After the chicken is cooked, let it cool enough so you will not melt the ziplock bags. Label the bags before you fill them. Then place the chicken and the sauce into the smallest freezer type ziplock that it will fit into. I usually use quart size.If you used the disposable pans, they can be washed in the dishwasher and reused several times, if you want.
You've just made the major part of dinner for 5 nights in under 1 hour! Not a bad return on your time.
***********************************************
The Shopping List
--print this out and cross off whatever you already have
- 5 lbs or 5 meals worth of chicken pieces
- 5 Aluminum 8x8 square pans (if you do not have enough regular ones)
- 1 box quart size, freezer style zip lock bags
- Non-stick cooking spray
- 1 small jar mayonnaise (low fat is fine)
- 1 small bottle honey
- 8 oz tomato sauce (or puree)
- 1 lemon OR small bottle lemon juice
- 1 small box Grapenuts cereal
- 1 small container seasoned or plain bread crumbs
- thyme
- 1 clove crushed garlic (about 1 tsp or 1/16 tsp garlic powder)
- 2 T dry minced onions
- beef bouillon (1 tsp or 1 cube)
- McCormick rotisserie chicken seasoning.
Tuesday, November 08, 2005
In the beginning….
From the Chief Cook and Bottle-Washer
I began playing with the freeze and serve approach some time after my second son was born. I got inspired by a magazine article on 'Investment cooking', the cook-once-eat- for-a-month idea. I loved the idea, but when push came to shove, the recipes just did not do it for me. They did not line up with the way my family ate--Thai Meatball Soup was not yet on my children’s dinner list! So I began to tinker around.
The result is what you have before you recipes which are slimed down to bare bones --easy to make, and pretty easy to eat and get your family to eat with you. If you have never done this, start small. Do not try to cook for a month at a time your first time out. Believe me, that much cooking can feel pretty overwhelming at first! Start with no more than a week at a time, or even less if you are feeling a little intimidated by it all. To help in this, each month I will feature a group of 5-6 recipes that are easy to cook all together. If that feels like too much, just try one at a time. The important thing is that you do not let yourself get intimidated, or feel guilty. The kitchen is no place for guilt!
Enough said, bring on the recipes!
Subscribe to:
Posts (Atom)
